In the first part of this tutorial series, I compared Medusa and Shopify to showcase how Medusa is the open-source alternative to Shopify. Where Shopify lacks when it comes to its pricing plans, minimal customization abilities, and inability to fit for every business use case, Medusa can compensate for it.
Medusa is an open-source headless commerce solution that allows you to own your stack and make it fit into whatever use case your business needs. It is fast and very flexible.
In the previous tutorial, you learned about Medusa’s 3 components and how you can install and run each of them. It is a very easy process that can get your store up and running in seconds.
In this tutorial, you will start making changes to the server to make it your own. You will learn how to create new API endpoints, services, and subscribers. The API you will create will retrieve the products with the most sales, and you will create a service and subscriber to help us do that.
The code for this tutorial is on this GitHub repository.
Prerequisites
This tutorial assumes you have already read and followed along with part 1. In the first part, you learn how to setup the Medusa store, which you will make changes to in this tutorial, as well as the Medusa storefront and the admin. If you have not went through it yet, please do before continuing with this tutorial.
In addition, you need to have Redis installed and running on your machine to be able to use subscribers. So, if you do not have it installed and you want to follow along with the tutorial you should go ahead and install it.
Add a Service
As mentioned earlier, you will be creating an API endpoint that allows you to get the top products, i.e. the products with the most sales.
In Medusa, services generally handle the logic of models or entities in one place. They hold helper functions that allow you to retrieve or perform action on these models. Once you put them in a service, you can access the service from anywhere in your Medusa project.
So, in this tutorial, you will create a service TopProductsService that will hold all the logic needed to update products with their number of sales and to retrieve the products sorted by their number of sales.
To create a service, start by creating the file src/services/top-products.jswith the following content:
import { BaseService } from "Medusa-interfaces";

class TopProductsService extends BaseService {
  constructor({ productService, orderService }) {
    super();
    this.productService_ = productService;
    this.orderService_ = orderService;
  }
}
Here are a few things to note about this service:
- When this service is retrieved in other places in your code, the service should be referred to as the camel-case version of the file name followed by “Service”. In this case, the file name is
top-product, so to access it in other places we usetopProductsService. - Similarly to how you will use this service, we inject as dependencies the
productServiceandorderServicein the constructor. When you create classes in Medusa, you can use dependency injection to get access to services.
Implement getTopProducts
The next step is to add the method getTopProducts to the TopProductsService class. This method will retrieve the products from the database, sort them by their number of sales, then return the top 5 products.
Inside TopProductsService class add the new method:
async getTopProducts() {
  const products = await this.productService_.list({
    status: ['published']
  }, {
    relations: ["variants", "variants.prices", "options", "options.values", "images", "tags", "collection", "type"]
  });
  products.sort((a, b) => {
    const aSales = a.metadata && a.metadata.sales ? a.metadata.sales : 0;
    const bSales = b.metadata && b.metadata.sales ? b.metadata.sales : 0;
    return aSales > bSales ? -1 : (aSales < bSales ? 1 : 0);
  });
  return products.slice(0, 4);
}
You first use this.productService_ to retrieve the list of products. Notice that the list method can take 2 optional parameters. The first one specifies where conditions, and the second parameter specifies the relations on this products to retrieve.
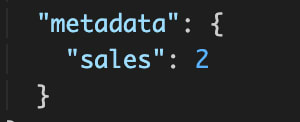
Then, you sort the array with the sort Array method giving it a compare function. In the compare function, you compare the number of sales stored inside the metadata field. In Medusa, most entities have the metadata field which allows you to easily add custom attributes in the default entities for your purposes. Here, you use the metadata field to store the number of sales. You are also sorting the products descending.
Finally, you use the splice Array method to retrieve only the first 5 items.
Implement updateSales
Next, you will implement the updateSales method in the TopProductsService. This method receives an order ID as a parameter, then retrieves this order and loops over the items ordered. Then, the salesproperty inside metadata is incremented and the product is updated.
Add the new method in TopProductsService:
async updateSales(orderId) {
  const order = await this.orderService_.retrieve(orderId, {
    relations: ["items", "items.variant", "items.variant.product"]
  });
  if (order.items && order.items.length) {
    for (let i = 0; i < order.items.length; i++) {
      const item = order.items[i];
      //retrieve product by id
      const product = await this.productService_.retrieve(item.variant.product.id, {
        relations: ["variants", "variants.prices", "options", "options.values", "images", "tags", "collection", "type"]
      });
      const sales = product.metadata && product.metadata.sales ? product.metadata.sales : 0;
      //update product
      await this.productService_.update(product.id, {
        metadata: { sales: sales + 1 }
      });

    }
  }
}
You first use this.orderService_ to retrieve the order by its ID. The retrieve method takes the order ID as the first parameter and a config object as the second parameter which is similar to the ones you used in the previous method. You pass it the relations array to retrieve the ordered items and their products.
Then, you loop over the items and use the product id inside each item to retrieve the product. Afterward, you increment the number of sales and update the product using the update method on this.productService_.
This service is now ready to update product sales numbers and retrieve products ordered based on their sales number.
Add an API Endpoint
Now, you will add an API endpoint to retrieve the top products. To add an API endpoint, you can do that by creating the file src/api/index.js with the following content:
import { Router } from "express"
export default () => {
  const router = Router()
  router.get("/store/top-products", async (req, res) => {
    const topProductsService = req.scope.resolve("topProductsService")
    res.json({
      products: await topProductsService.getTopProducts()
    })
  })
  return router;
}
Creating an endpoint is easy. You just need to export an Express Router. This router can hold as many routes as you want.
In this code, you add a new GET route at the endpoint /store/top-products. The reason you are using store here as a prefix to top-products is that Medusa prefixes all storefront endpoints with /store, and all admin endpoints with /admin. You do not need to add this prefix, but it is good to follow the conventions of the Medusa APIs.
In this route, you retrieve the service you created in the previous section with this line:
const topProductsService = req.scope.resolve("topProductsService")
You can retrieve any service inside routes using req.scope.resolve. As explained in the services section, you need to use the camel-case version of the file name followed by Service when referencing a service in your code.
After retrieving the service, you can then use the methods you created on it. So, you return a JSON response that has the key products and the value will be the array of top products returned by getTopProducts.
Let us test it out. You can access this endpoint at localhost:9000/store/top-products. As this is a GET request, you can do it from your browser or using a client like Postman or Thunder Client.
You should see an array of products in the response. At the moment, nothing is sorted as you have not implemented the subscriber which will update the sales number.

Add a Subscriber
Finally, you will add a subscriber which will update the sales number of products when an order is placed.
Before creating the subscriber, you need to make sure that Redis is installed and running on your machine. You can test that by running the following command in your terminal:
redis-cli ping
If the command returns “PONG” then the Redis service is running.
Then, go to Medusa-config.js in the root of your project. You will see that at the end of the file inside the exported config there is this line commented out:
// redis_url: REDIS_URL,
Remove the comments. This uses the variable REDIS_URL declared in the beginning of the file. Its value is either the Redis URL set in .env or the default Redis URL redis://localhost:6379. If you have a different Redis URL, add the new variable REDIS_URL in .env with the URL.
Then, restart the server. This will take the updated configuration and connect to your Redis server.
Now, you will implement the subscriber. Create the file src/subscribers/top-products.js with the following content:
class TopProductsSubscriber {
  constructor({ topProductsService, eventBusService }) {
    this.topProductsService_ = topProductsService;
    eventBusService.subscribe("order.placed", this.handleTopProducts);
  }
  handleTopProducts = async (data) => {
    this.topProductsService_.updateSales(data.id);
  };
}
export default TopProductsSubscriber;
Similar to how you implemented TopProductsService, you pass the topProductsService in the constructor using dependency injection. You also pass eventBusService. This is used to subscribe a handler to an event in the constructor.
You subscribe to the order placed event with this line:
eventBusService.subscribe("order.placed", this.handleTopProducts);
The subscribe method on eventBusService takes the name of the event as the first parameter and the handler as the second parameter.
You then define in the class the handleTopProducts method which will handle the order.placed event. Event handlers in Medusa generally receive a dataobject that holds an id property with the ID of the entity this event is related to. So, you pass this ID into the updateSales method on this.topProductsService_ to update the number of sales for each of the products in the order.
Test It Out
You will now test everything out. Make sure the server is running. If not, run it with the following command:
npm start
Then, go to the Medusa storefront installation and run:
npm run dev
Go to the storefront and place an order. This will trigger the TopProductsSubscriber which will update the sales of the products in that order.
Now, send a request to /store/top-products like you did before. You should see that sales inside the metadata property of the products in that order has increased.

Try to add a new product from the admin panel or use the database in the GitHub repository of this tutorial, which has an additional product. Then, try to make more orders with that product. You will see that the sorting in the endpoint has changed based on the number of sales.
Conclusion
In this tutorial, you learned how to add custom API endpoint, service, and subscriber. You can use these 3 to implement any custom feature or integration into your store.
In the next tutorial, you will use the API endpoint you created in this part to customize the frontend and add a product slider that showcases the top selling products on your store.
In the meantime, should you have any issues or questions related to Medusa, then feel free to reach out to the Medusa team via Discord.

